I am attempting to reimplement MultiTextConverter in Swift. This time, I am creating the look and feel of the preferences window.
Please see this article for the background.

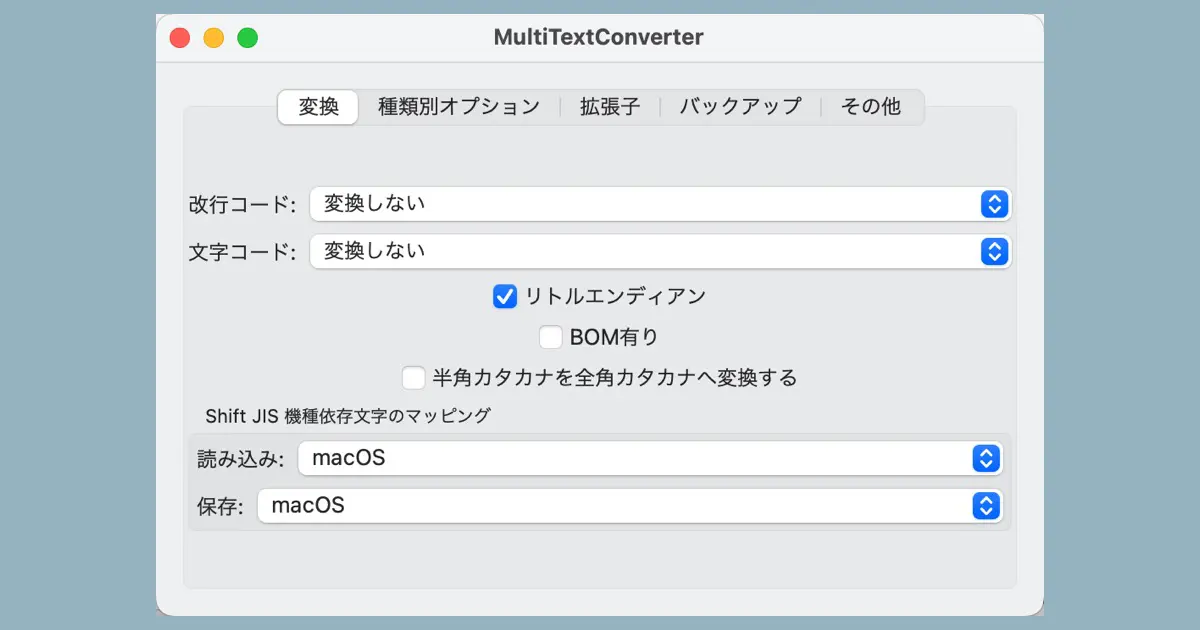
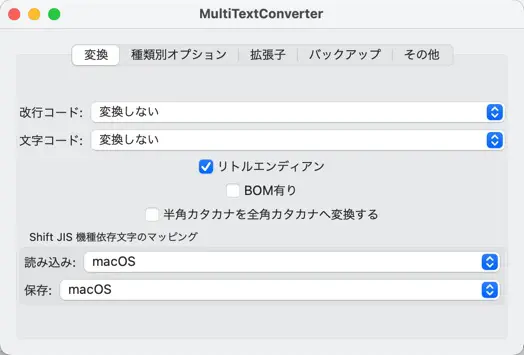
The window of the MultiTextConverter 3.6
In the MultiTextConverter 3.6, selecting Preferences from the MultiTextConverter menu brings up the preferences window.
The preferences window is tabbed, and includes the following sections.
- 変換 : Specify the conversion methods
- 種類別オプション : Options for the HTML, XML and CSS files
- 拡張子 : The name extension of the target
- バックアップ : The option for the backup function
- その他 : Other options
SwiftUI version
SwiftUI apps don’t have the Preferences in the application menu. Additionally, for convenience, I would keep the preferences window visible at all times by making it part of the main application window.
I plan to keep the content in the tabs the same, except for those that no longer make sense in the current context.
How to create the tab view in SwiftUI
The code would look like this for creating a tab view in SwiftUI.
TabView {
    View() // The view displayed in the tab
        .tabItem {
            // The view displayed in the tab label area
            Text("")
        }
}
Create the tab of the MultiTextConverter
In the case of the MultiTextConverter, there are five tabs, each with different content, so create a SwiftUI view for each tab.
struct ContentView: View {
var body: some View {
TabView {
ConverterOptionView()
.tabItem {
Text("変換")
}
TypeSpecificOptionView()
.tabItem {
Text("種類別オプション")
}
FileTypeOptionView()
.tabItem {
Text("拡張子")
}
BackupOptionView()
.tabItem {
Text("バックアップ")
}
GeneralOptionView()
.tabItem {
Text("その他")
}
}
.padding()
}
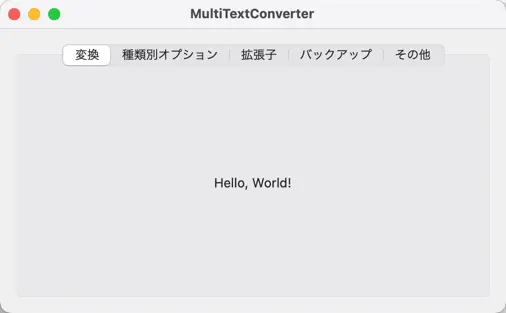
}The label string is directly written in Japanese. For localization support, it would be better to use English. However, the initial priority is to establish the functionality. A screen capture at this point looks like this.
Create the conversion tab
Create the contents of the conversion tab. I would place the controls as follows.
- The popup button for the “改行コード” (The line break character).
- The popup button for the “文字コード” (The text encoding).
- The check box for the “エンディアン” (The endian).
- The check box for the BOM option.
- The check box for the “半角カタカナの変換オプション” (The conversion of the half-width katakana characters).
- The popup button for the mapping option of the Shift-JIS model-dependent characters.
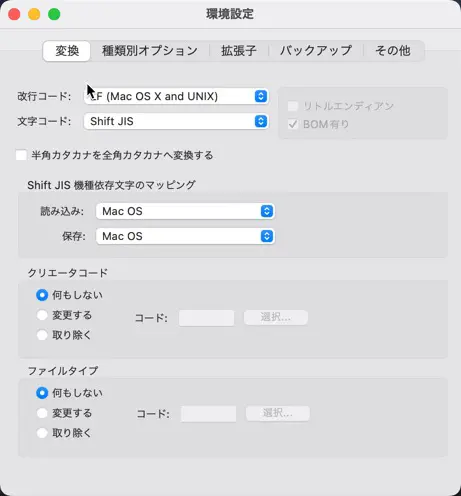
I plan to remove the “creator code” and “file type” options, as these pieces of information are not used today.
Create a popup button for line feed code
To create a popup button in SwiftUI, use Picker. For example, the popup button for the line feed code has 5 menu items.
- 変換しない (Dont’ Convert)
- LF (macOS and UNIX)
- CR (Mac OS 9)
- CR+LF (Windows)
- LS (Unicode)
MultiTextConverter 3.6 uses the notation LF (Mac OS X and UNIX), but the official name of the current Mac OS is macOS, not Mac OS X, so I will change this item.
The code looks like this.
struct ConverterOptionView: View {
    @State private var lineBreakType: Int = 0

    var body: some View {
        VStack {
            Picker("改行コード:", selection: $lineBreakType) {
                Text("変換しない").tag(0)
                Text("LF (macOS and UNIX)").tag(1)
                Text("CR (Mac OS 9)").tag(2)
                Text("CR+LF (Windows)").tag(3)
                Text("LS (Unicode)").tag(4)
            }
        }
    }
}
The binding destination for the selected position is assigned by adding a property for now. Formally, we need to bind to a destination that will store the settings. Still, for now, we are prioritizing the creation of the appearance.
We also created a popup button for character codes in the same way.
Create little-endian checkboxes
To create a checkbox in SwiftUI, use Toggle.
struct ConverterOptionView: View {
    @State private var isLittleEndian: Bool = true

    var body: some View {
        VStack {
            Toggle("リトルエンディアン", isOn: $isLittleEndian)
        }
    }
}
Shift JIS model-dependent mapping group box
To create a group box in SwiftUI, use GroupBox; in MultiTextConverter, the code would look like this.
struct ConverterOptionView: View {
    @State private var sjisMappingRead: Int = 0
    @State private var sjisMappingWrite: Int = 0

    var body: some View {
        VStack {
            GroupBox("Shift JIS 機種依存文字のマッピング") {
                Picker("読み込み:", selection: $sjisMappingRead) {
                    Text("macOS").tag(0)
                    Text("Windows (Code Page 932)").tag(1)
                }

                Picker("保存:", selection: $sjisMappingWrite) {
                    Text("macOS").tag(0)
                    Text("Windows (Code Page 932)").tag(1)
                }
            }
        }
    }
}
Status at this time
If you run it now, you will see something like this.
It may be necessary to make a few layout adjustments. Make the following adjustments.
- Overall margins are small, so make margins on the left and right.
- Vertically centered, so move it to the top edge.
- Checkboxes are centered, so make them left-aligned.
Adjustments will be carried over to the next article.
Summary of how to create tabs in SwiftUI
The following article describes how to create tabs in SwiftUI.