


Documents maintained in Git are easier to manage and update when written in Markdown, as opposed to Word or Excel.
However, even though Markdown is suitable for viewing from GitLab and other sites that render Markdown, it’s often more visually appealing when converted to a PDF through Word for external distribution.
Therefore, I’ll guide you on how to create PDFs using an application called Marked2.
What is the Marked2?
Marked2 is a Markdown viewer app for Mac, available for purchase from the Mac App Store or via SETAPP subscription.

Although you can stylize your Markdown rendering using a VS Code plugin and adding GitHub-style CSS, it can be time-consuming. It’s a lot of work, but it’s only for the first time, so I thought it was OK, but after doing it many times, it became tedious, and I started using Marked2.
Marked2 is a paid application, but it offers the advantage of choosing GitHub-style rendering from the outset and the ability to output in HTML and docx formats, in addition to PDF. This article will be in PDF, but you can also output to docx and finish in Word.
Marked2 Configuration
You can configure various settings from Preferences in the Marked2 menu. My recommended settings are as follows.
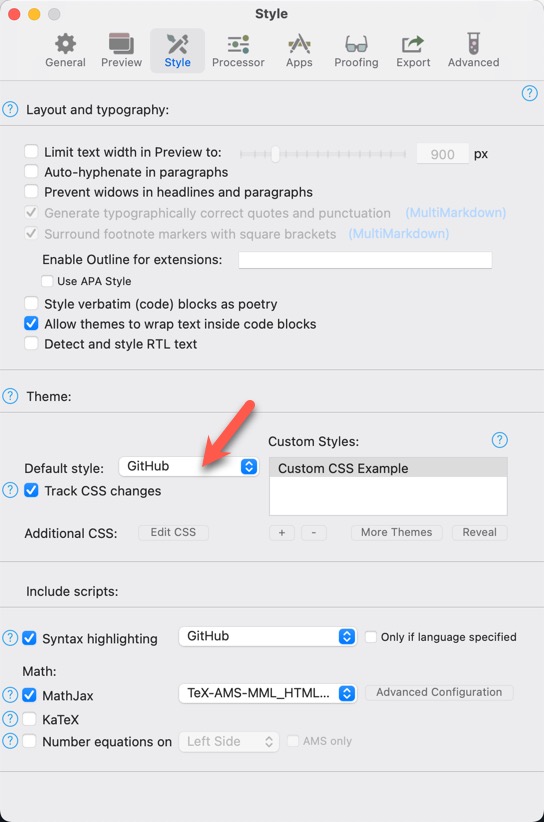
Style Tab
In the Style tab, change the Default style: to GitHub; Marked2 will render Markdown in the same style as GitHub.
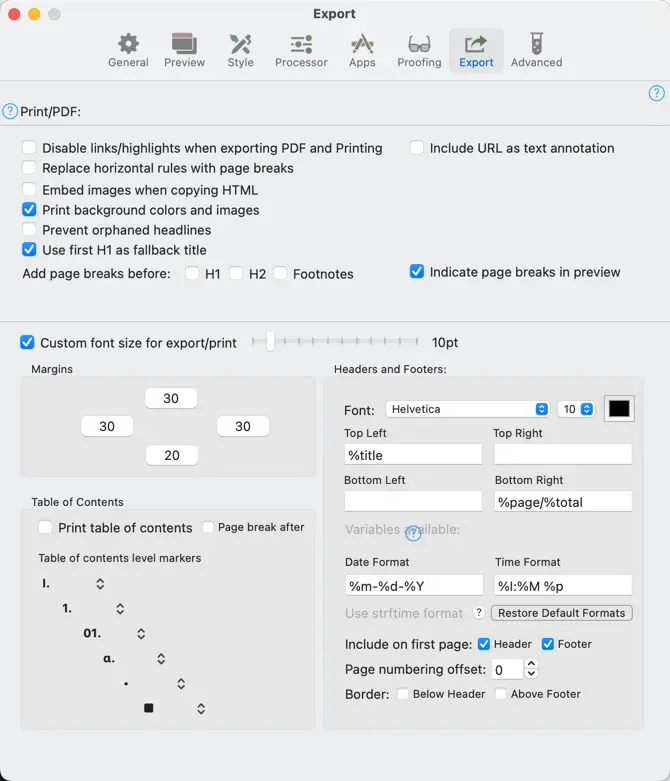
Export Tab
Turn on the following configurations.
- Print background colors and images
- Use first H1 as fallback title
- Indicate page breaks in preview
If you turn on “Indicate page breaks in preview” option, you can see page breaks in the preview. In addition, you can insert page breaks as needed.
In the Headers and Footers group, enter %title into the Top Left and %page/%total into the Bottom Right. Next, turn on Header and Footer of Include on first page.
With this configuration, Marked2 will insert the document title at the header and the page number at the footer when creating PDFs.
Create a PDF
To create a PDF, select Save PDF (Paginated) of Export As in File menu.
Tips
Here are a few tips for creating PDFs using Marked2.
Separate pages at specific locations.
In Markdown, you can insert a page break by writing the following.
<!--BREAK-->Include a table of contents
While it won’t create a PDF bookmark, it can generate a hyperlinked table of contents page. Marked2 inserts it at the following location.
<!--TOC-->The Print table of contents option on the Export tab of the Preferences window should be turned off, as the Print table of contents option forces generation at the beginning of the document, which is not user-friendly.
Also, even if you turn off the `Page break after` option, you can use it with the `<!–BREAK–>` option. This way allows you to create a dedicated page for the table of contents at any location, which is more user-friendly.
<!--BREAK-->
## Table Of Contents
<!--TOC-->
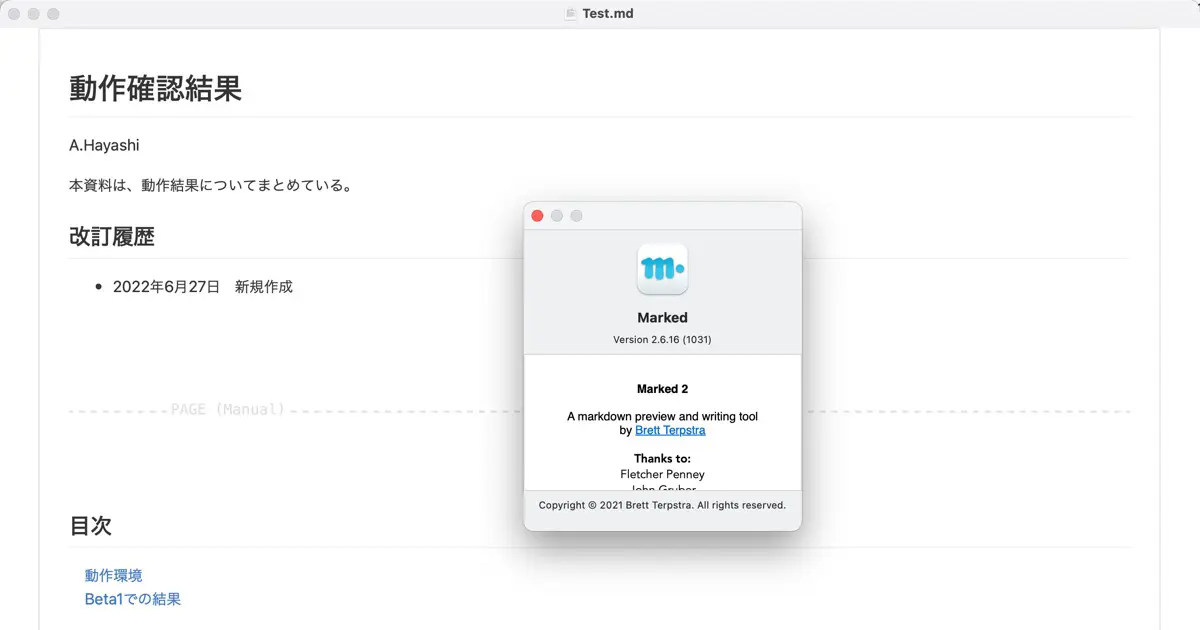
<!--BREAK-->The headings before the <!-- TOC--> will not be included in the table of contents, so you should write items you do not wish to include before <--TOC--> . For example.
# Check Result

A.Hayashi

This document summarizes the test results.

## Revision History

- June 27, 2022 Newly created

<!--BREAK-->

## Table of Contents

<!--TOC-->
<!--BREAK-->

## System Requirements

The system requirements is following.

## Test result of Beta 1

No erros in Beta 1.
The image below is a screen capture of the preview window with the Markdown file rendered by Marked2.
There is a page break before and after the table of contents, which is a page dedicated to the table of contents. Also, the table of contents does not include headings such as Revision History or Table of Contents.


