


This series of articles explains how to create a Cocoa version of Hello World. This time, we will create Hello World with zero coding, just editing the storyboard.
In this article, we use Xcode. If you have not installed Xcode, please see the following article to set up Xcode.

What is Cocoa?
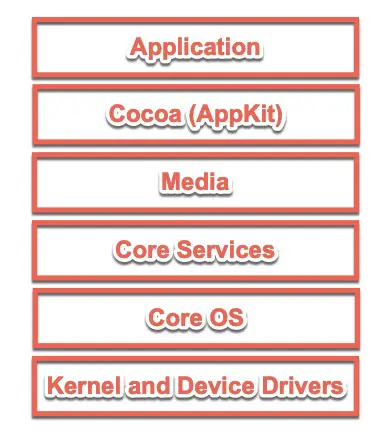
macOS has a layered structure. The Cocoa Application Layer is situated at the upper level of the layered structure. It provides the APIs necessary for creating applications with a macOS app-like feel. The upper layers are implemented using the lower layers.
“Cocoa” is more commonly used in the narrow sense of API than as an application layer. However, you may not only come across this term a few times. Since “UIKit” was introduced for creating iOS applications and “SwiftUI” for cross-platform use in the Apple Platform, it seems that the framework name “AppKit” has become more common than the term “Cocoa.”
Incidentally, “UIKit” used to be called “Cocoa Touch,” but now the framework name “UIKit” seems more established.
About SwiftUI
SwiftUI is implemented with native APIs for each platform. It uses AppKit on macOS, and UIKit on iOS. So when you implement your apps with SwiftUI, it uses appropriate native APIs even if you don’t use them directly.
For this reason, I thought about using SwiftUI from the beginning of this series. Still, the implementation status of SwiftUI for macOS apps needs to be improved as of macOS Monterey 12. macOS Ventura 13 and later will improve the situation considerably. While the situation is expected to improve significantly with macOS Ventura 13, the full realization of these improvements remains in the future. With that in mind, we will start by explaining app development using AppKit.

On October 27, 2022, macOS Ventura 13 was officially released, so things have slightly changed since I wrote the article.
Create the project
Create a macOS app project using Xcode as follows.
(1) Select the “Project…” in the submenu of “New” in the “File” menu.
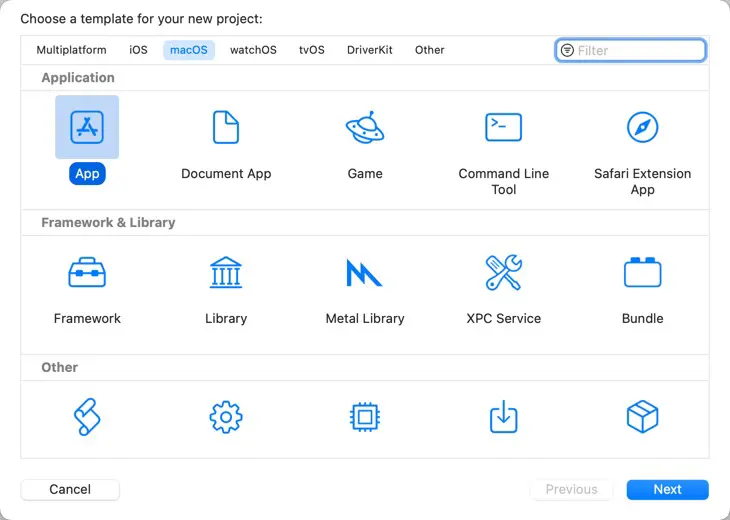
(2) Select the template and click the “Next” button.
The project template dialog is displayed. Click the “macOS” tab, select the “App,” and click the “Next” button.
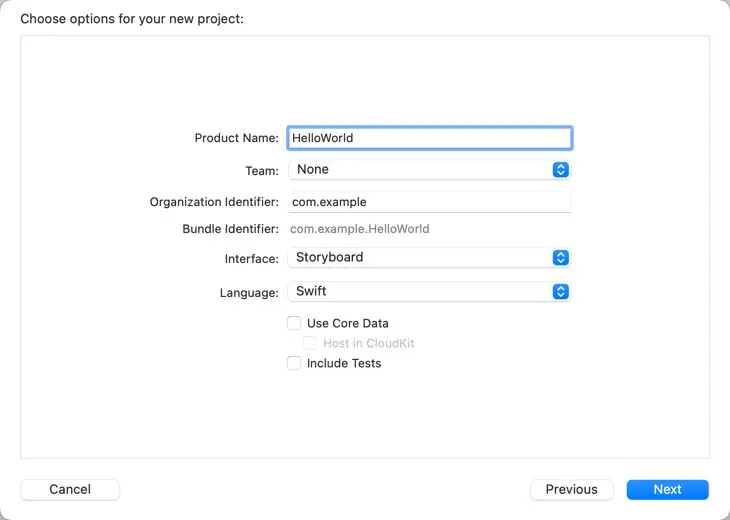
(3) Enter the project option and click the “Next” button.
Enter the project option as follows and click the “Next” button.
| Option | Value | Description |
|---|---|---|
| Product Name |
HelloWorld
| The name of the project. |
| Team |
None
| The development team. |
| Organization Identifier |
com.example
| The prefix of the bundle identifier. |
| Interface |
Storyboard
| The user interface technology. |
| Language |
Swift
| The main programming language. |
| Use Core Data | Off | Use CoreData or not. |
| Include Tests | Off | Create the targets for the test bundle or not. |
Note that you can change any of these settings later. For example, you can use SwiftUI even if you select the Storyboard as Interface and any programming language even if you choose Swift as a Language.
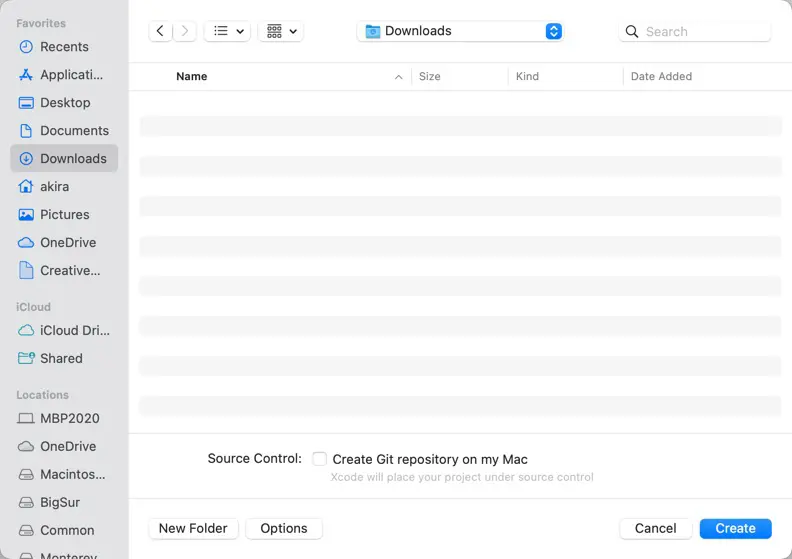
(4) Select the save location and click the “Create” button.
The save pane is displayed. Select the save location and click the “Create” button. If you turn on the “Create Git repository on my Mac” checkbox, Xcode will create the local Git repository. If you want to create it, then turn on this option. I usually turn off this option, create the remote git repository in GitLab or GitHub, clone it to the local, and copy the created project and files there.
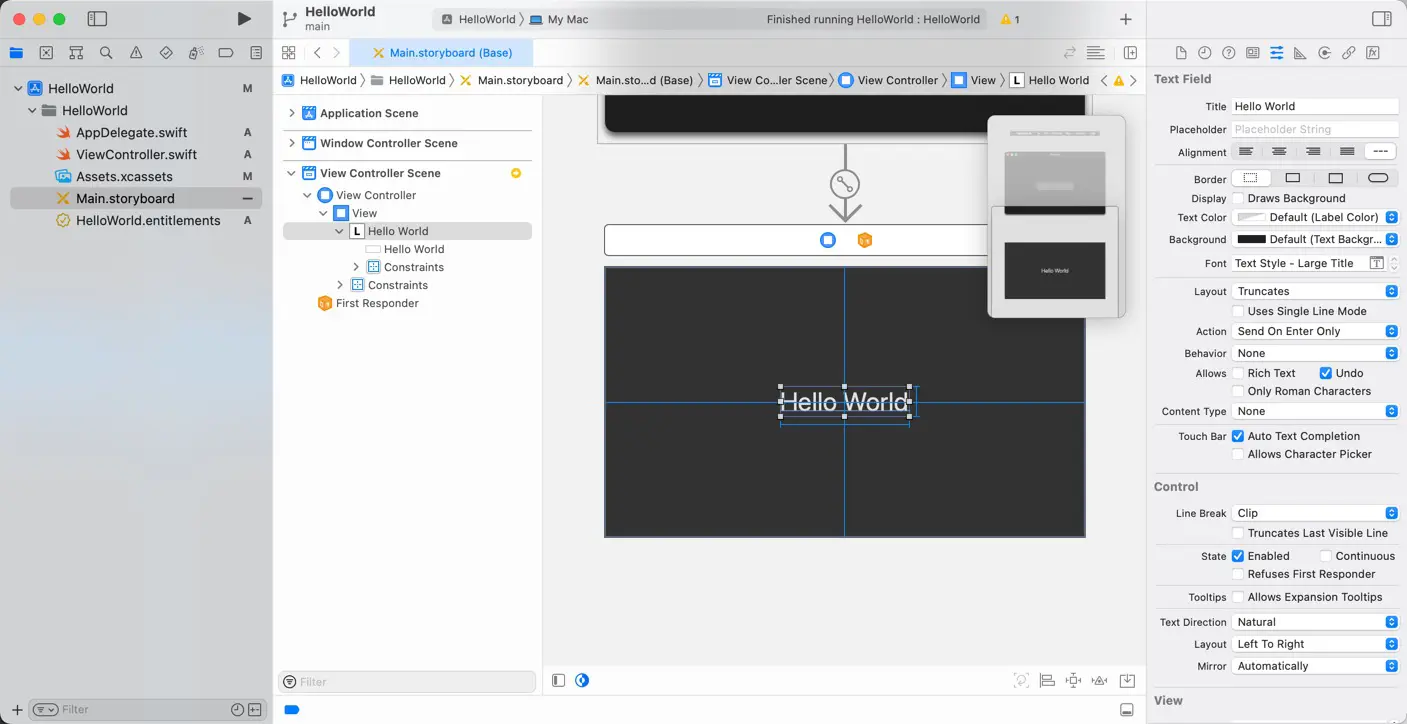
Edit the storyboard file
Codes generated from the template load the Main.storyboard when the application is launched. The Main.storyboard displays an empty window when the application is launched.
Let’s edit the Main.storyboard to show the “Hello World” text in the empty window.
Add the label
Follow these steps to add a label:
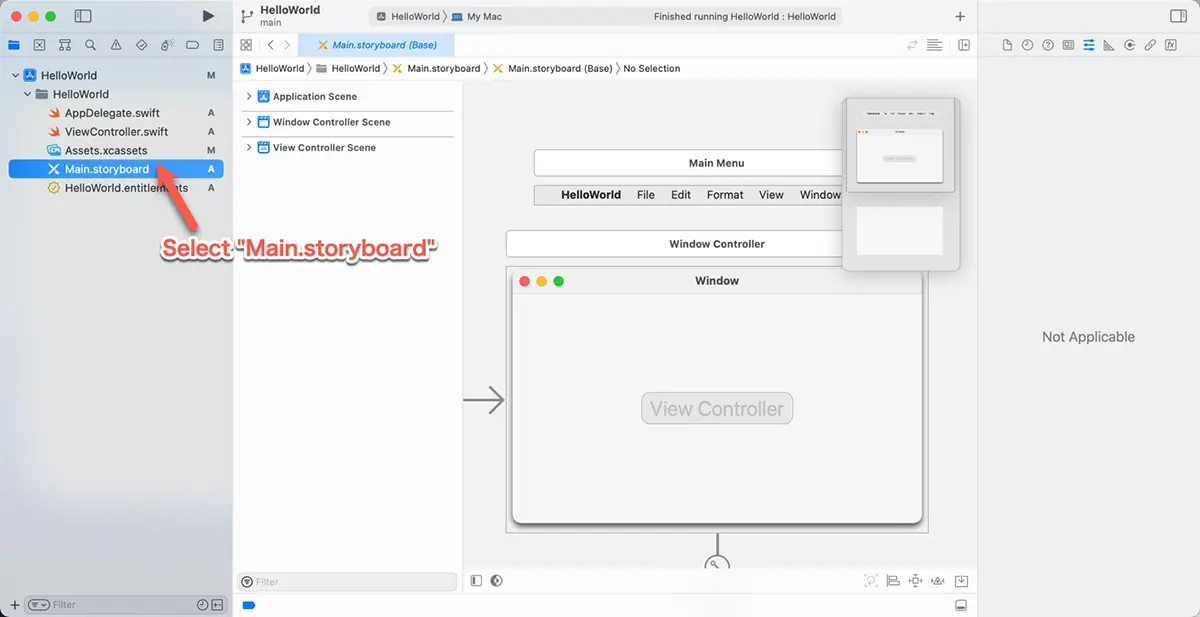
(1) Select the “Main.storyboard” in the project window in Xcode.
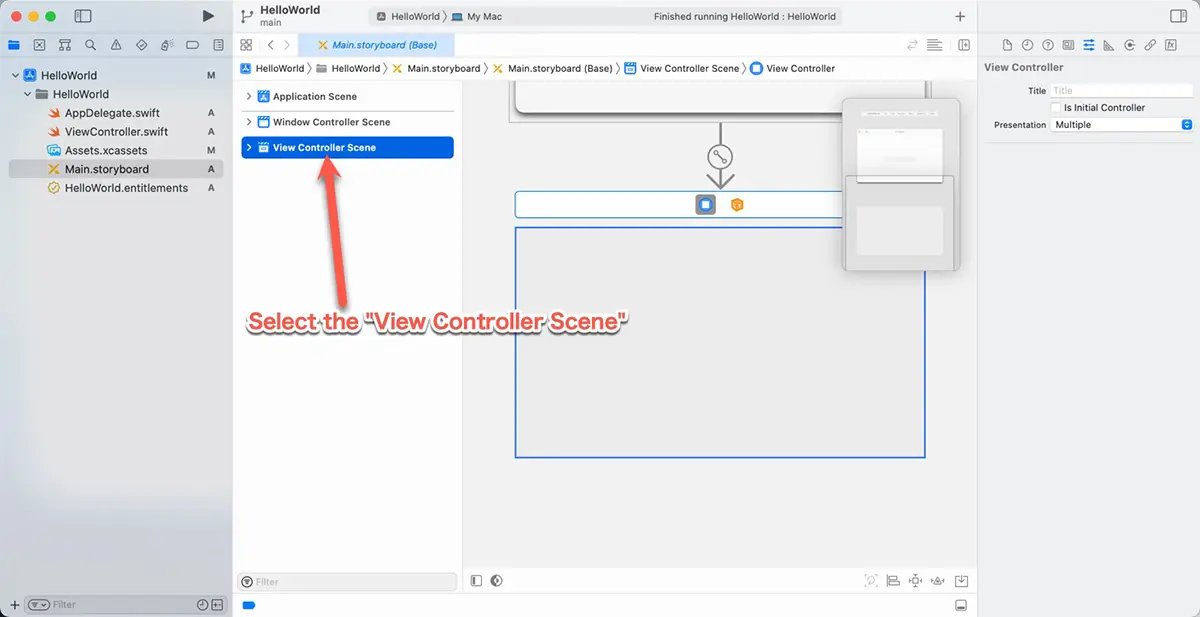
(2) Select the “View Controller Scene”.
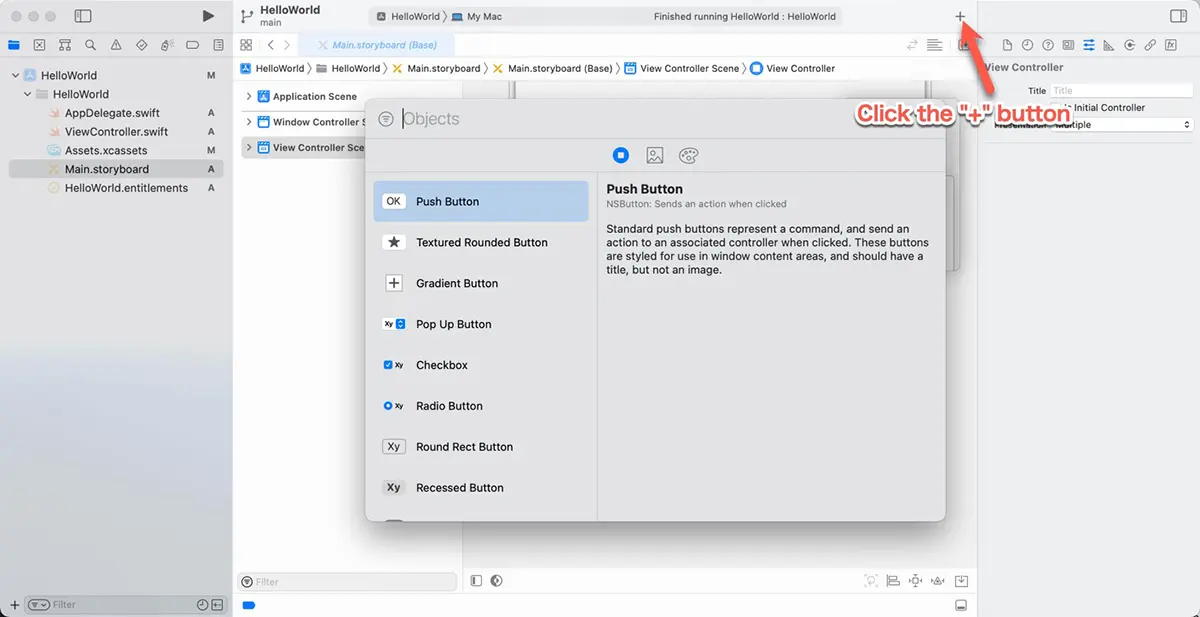
(3) Click the “+” button in the toolbar. Object window will be displayed.
(4) Drag the “Label” and drop it onto the “View Controller Scene”. The new label will be added to the view.
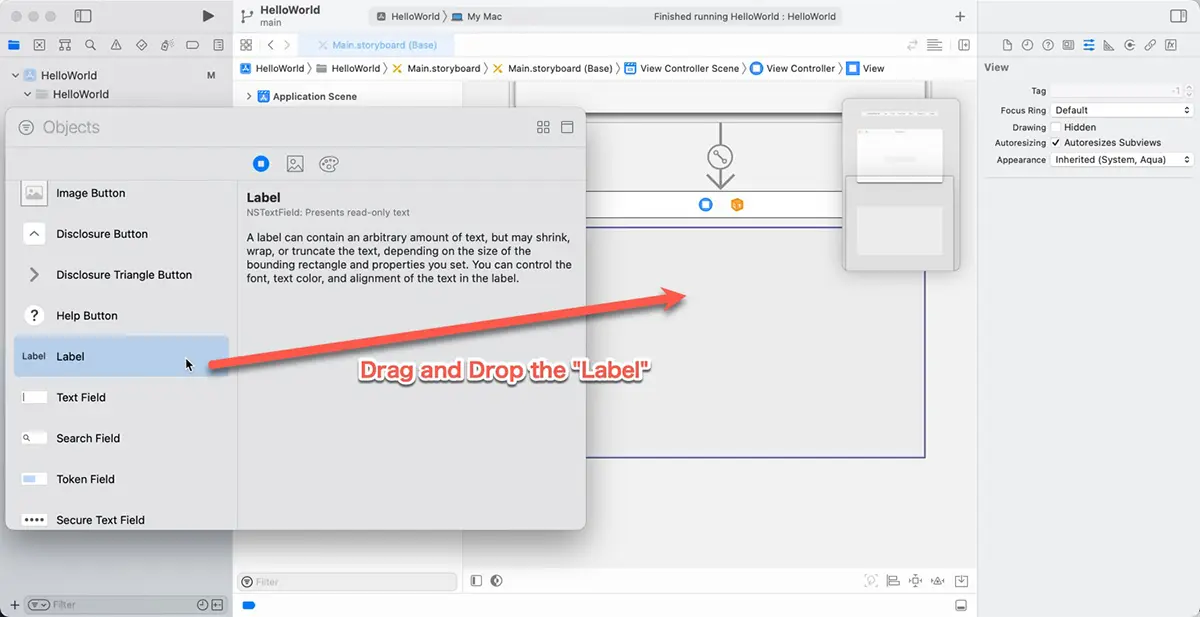
(5) Double-click the label.
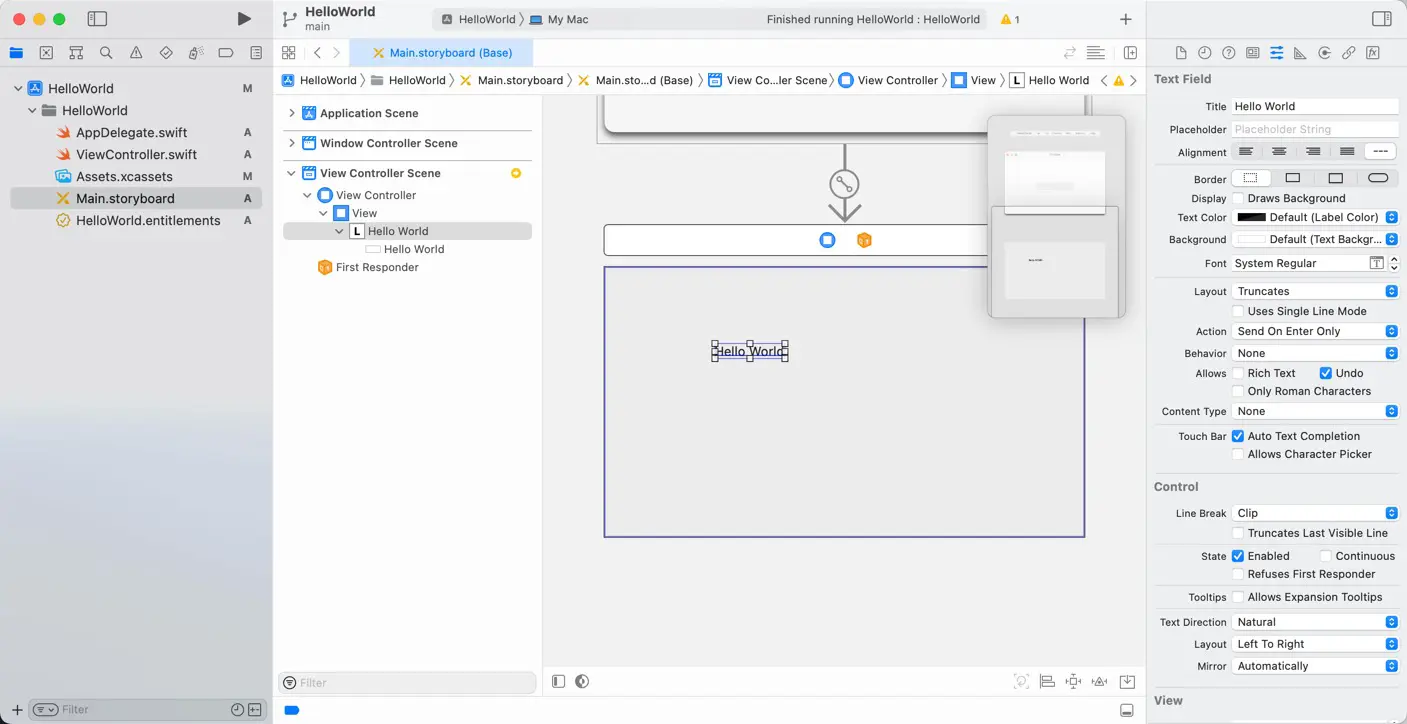
Once the label is in edit mode, type “Hello World” and press the “Return” key.
Change the text size
Change the text size. In macOS, you can specify the text size with point value or system-defined text style. Unfortunately, macOS doesn’t support Dynamic Type, so the system settings do not change the font size dynamically.
Change the text size by doing the following.
(1) Select the label in the preview.
If you select the label when the label is already selected, the internal cell will be selected. If the internal cell is selected, click the point in the view where any sub-view is not placed to unselect all and select the label again.
(2) Click the attributes inspector button, which is located on the right side of the project window.
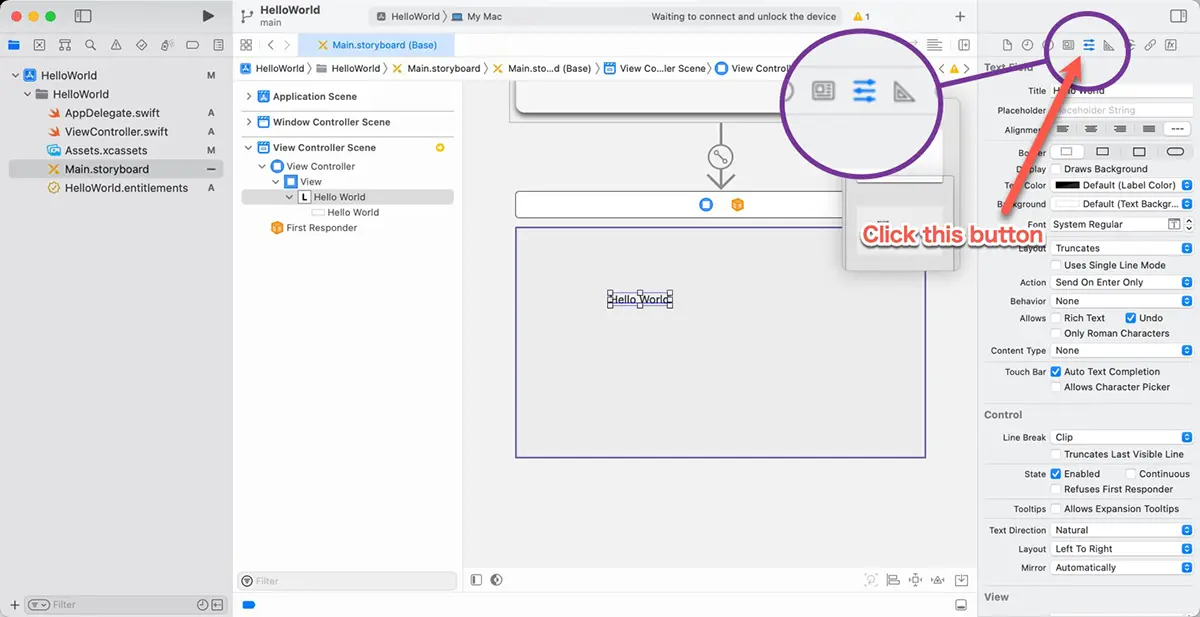
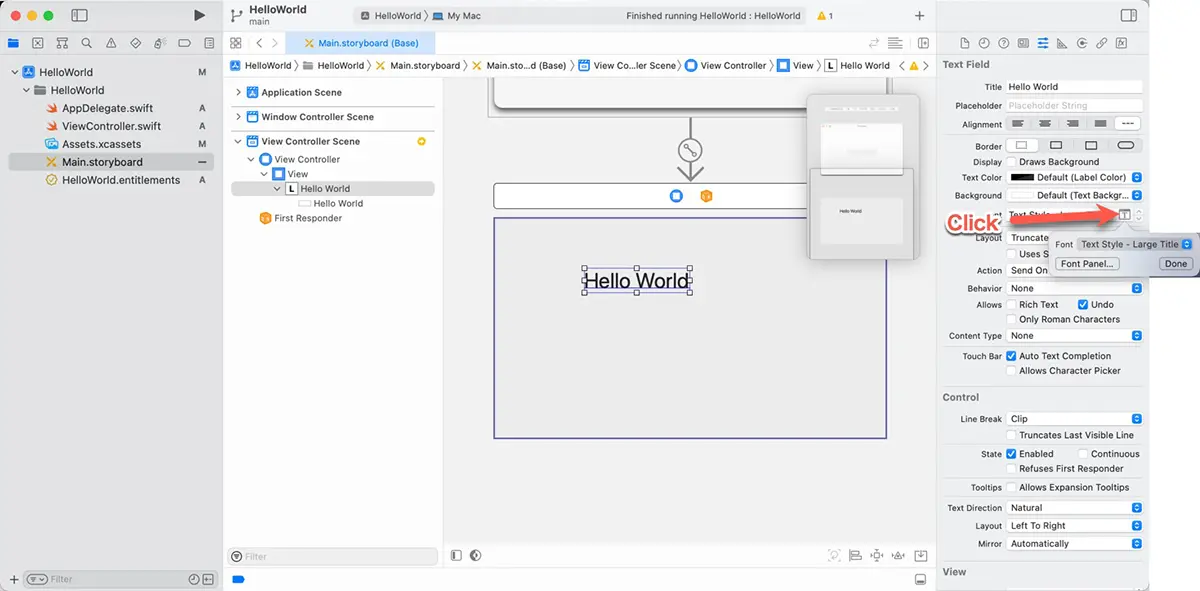
(3) Change the font size.
Click the “T” button, which is located on the side of the “Font” in the attributes inspector, and select the “Large Title” from the “Font.” The text size will be changed.
Auto layout
AppKit has an auto layout that controls the location and the size of views. It is a highly functional layout function with flexible control but becomes more complex when combined.
In this article, set the auto layout to center the label. Do following.
(1) Select the label in the preview if it is not selected.
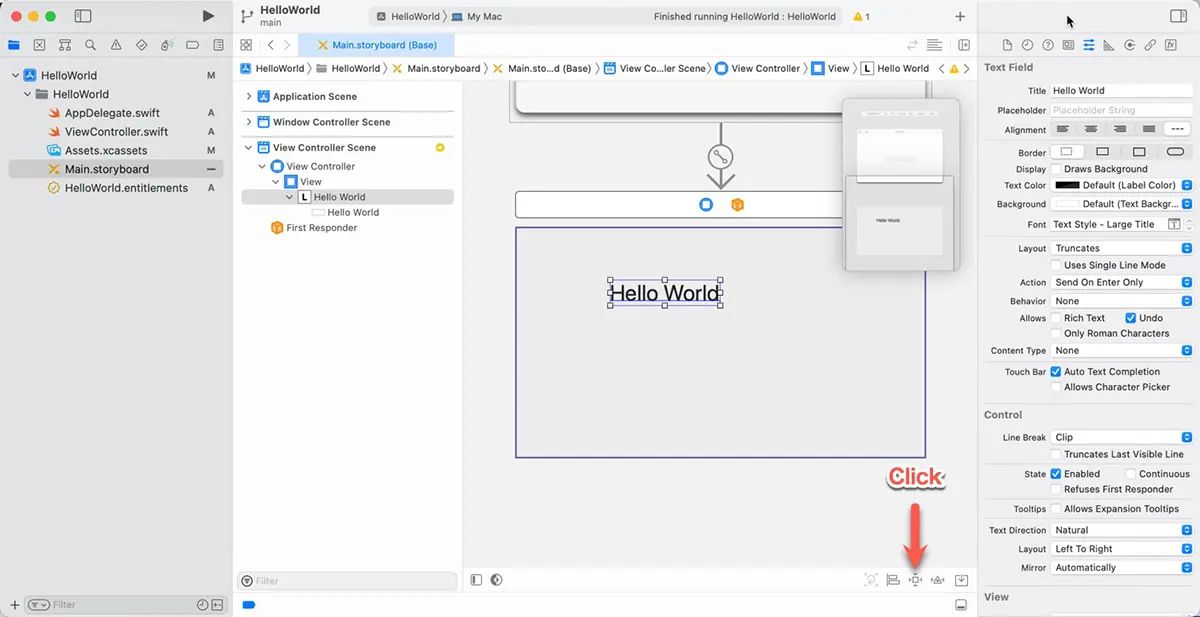
(2) Click the add new constraint button.
The new constraint sheet will be displayed. The constraint is a rule of the auto-layout.
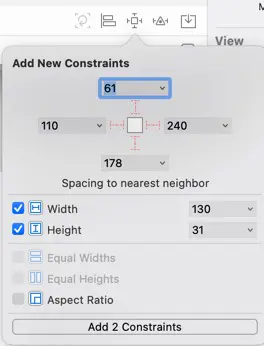
(3) Turn on “Width” and “Height, and click the “Add 2 Constraints” button.
The displayed value is the current size of the label in the preview. This operation adds the constraints that fix the width and height to the specified value. Then, the red frame will appear around the label in the preview. This means that more than the constraints are needed, and the layout will fail, yet more constraints are needed.
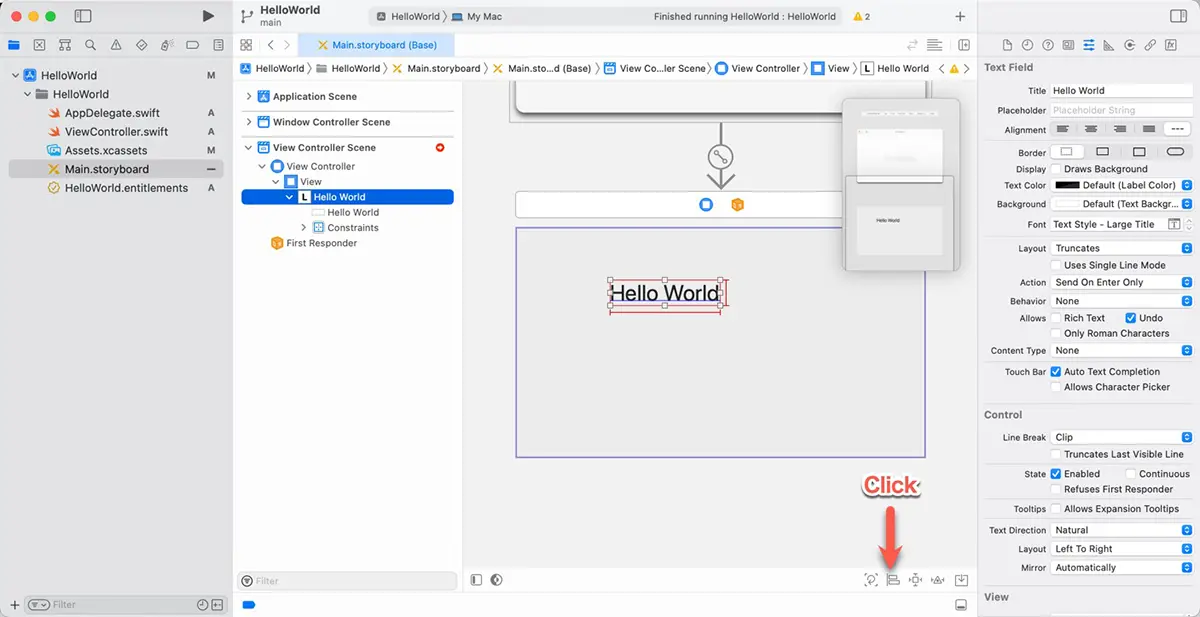
(4) Click the new alignment constraints button.
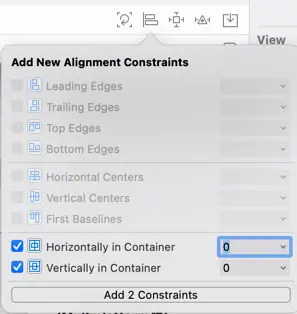
(5) Turn on “Horizontal in Container” and “Vertically in Container” and click the “Add 2 Constraints” button.
Add the two constraints in this operation and align the label to the horizontal and vertical centers.
(6) The preview is updated.
The label moves to the center of the view. The red frame around the label will be removed. Instead, the blue lines and blue frame will appear. The appropriate constraints are set, and the auto-layout will work fine.
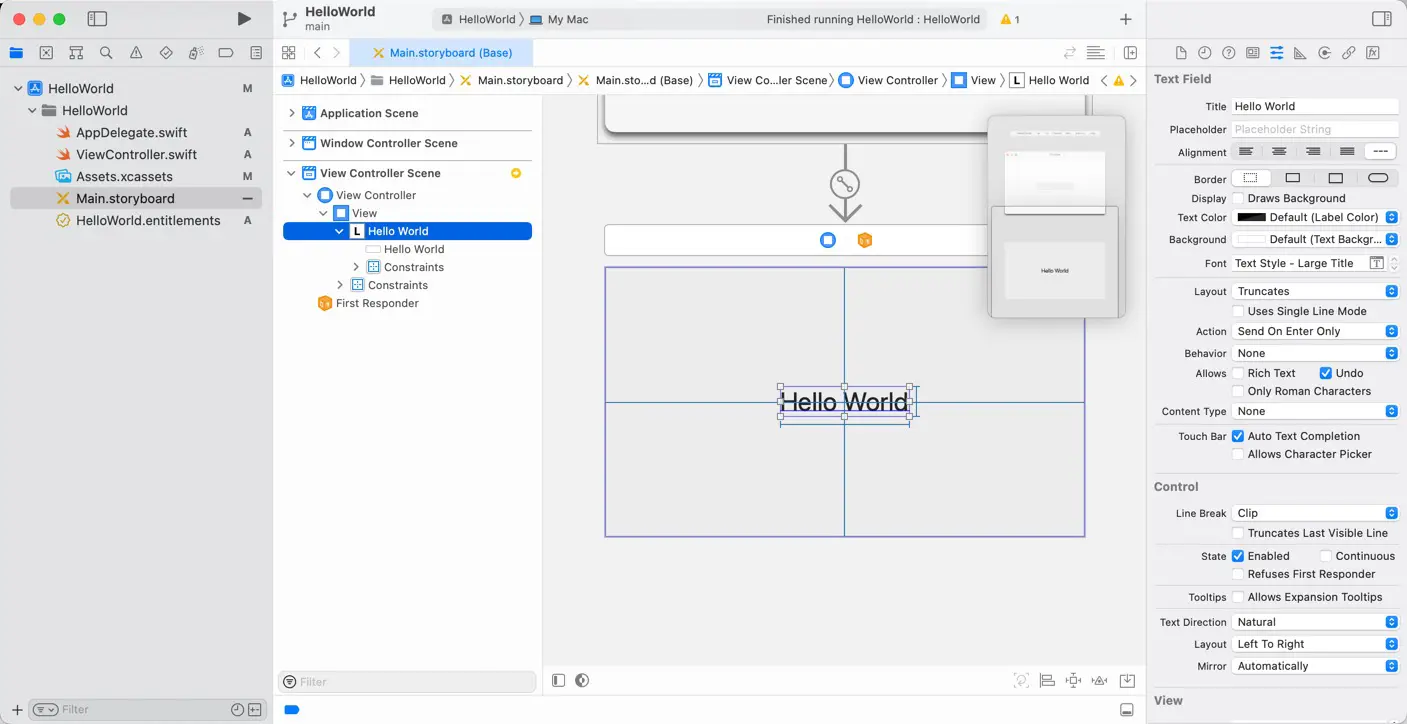
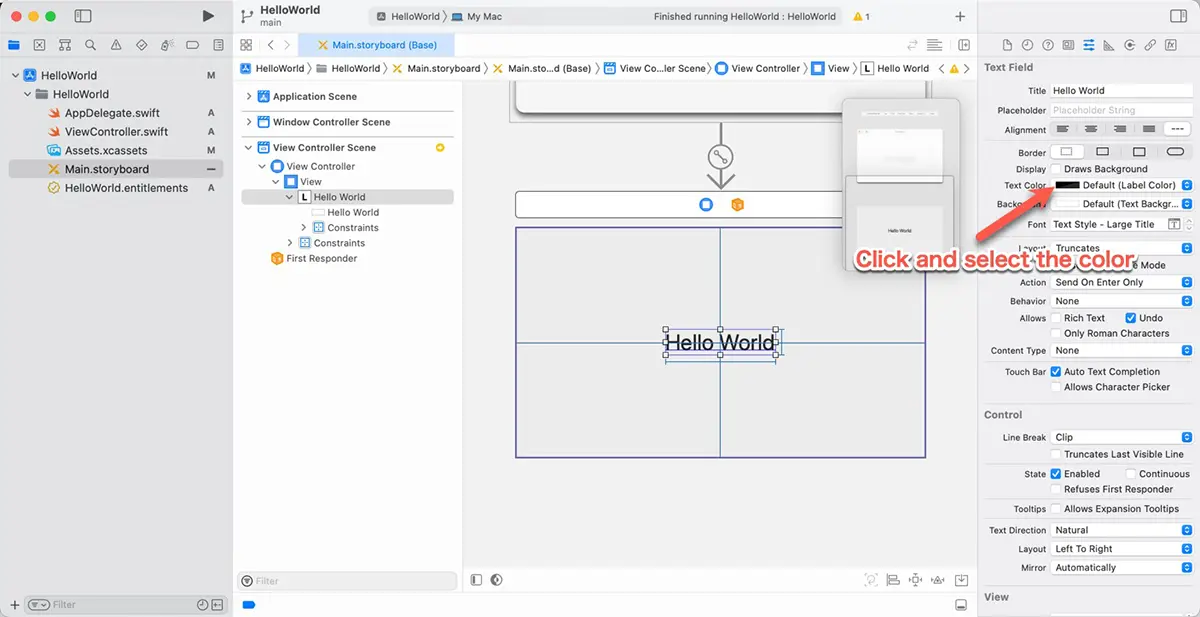
Change the text color
Next, let’s change the text color. In AppKit, you have the option to specify the text color either by an absolute value or by using a system-defined color. In this article, we use system-defined color. Do as follows.
(1) Select the label if it is not selected.
(2) Select the “System Blue Color” from the “Text Color” in the attributes inspector. The text color will be changed.
Check the dark mode
macOS has two appearance modes: light mode and dark mode. First, check the appearance of the dark mode. Then, click the “Appearance” button at the bottom of the preview. Each time you click, the appearance mode of the preview switches.
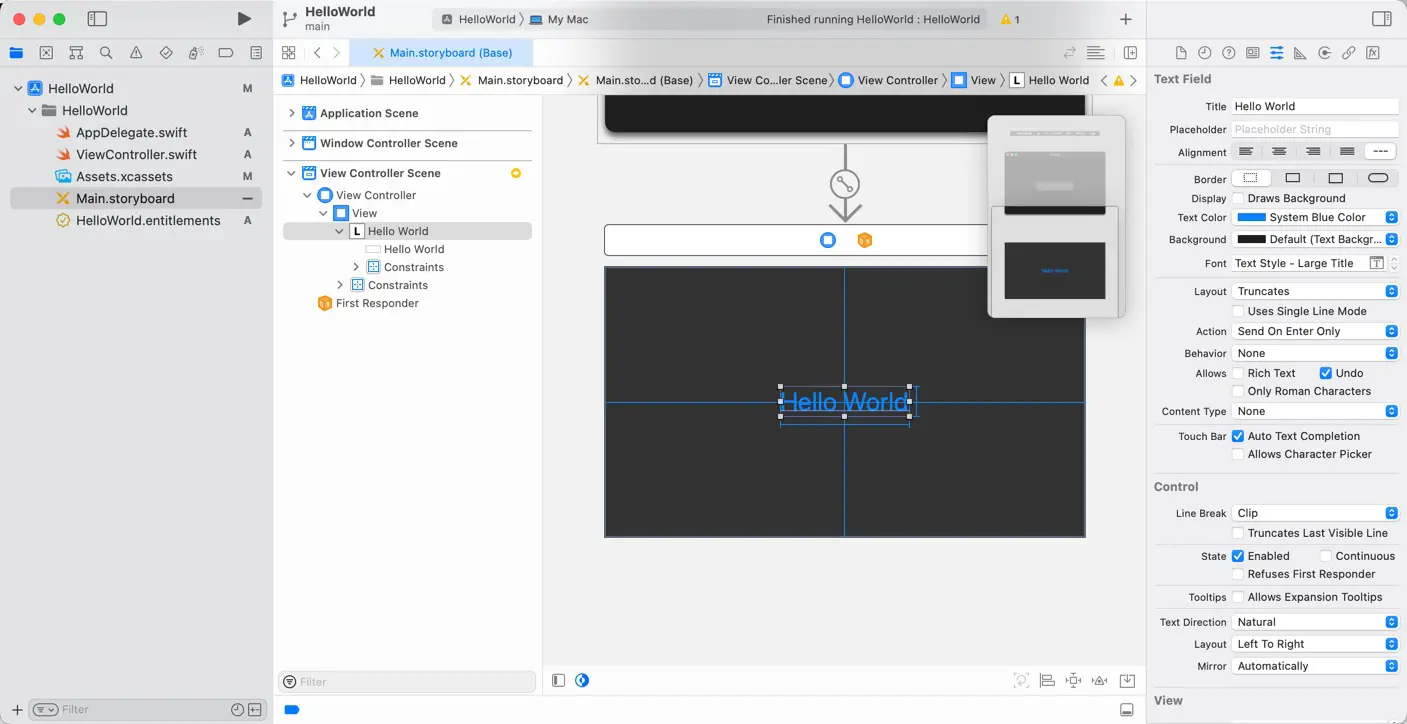
When you use a system-defined color, the text color is changed depending on the appearance mode of the system. We check the RGB value of the “System Blue.” The result is the following table.
| Appearance Mode | RGB Value |
|---|---|
| Light Mode |
0, 122, 255
|
| Dark Mode |
10, 132, 255
|
If it is difficult to see the difference in changes, set the text color to the “Text Color” or “Label Color.” They dramatically change depending on the appearance mode.
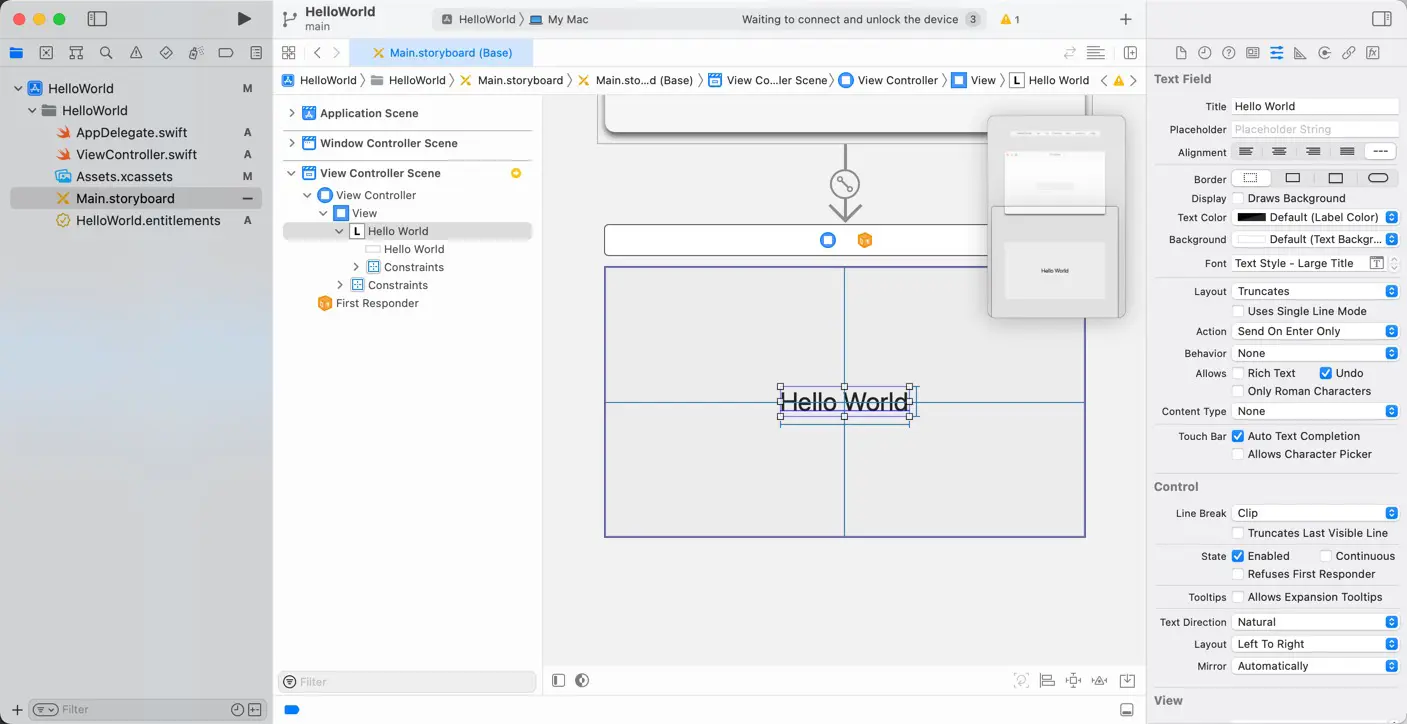
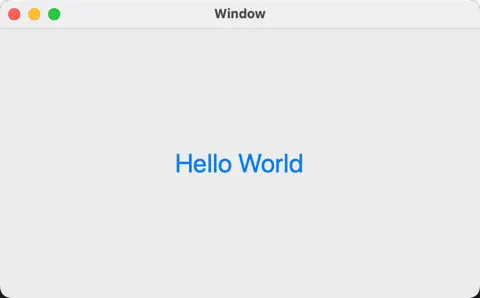
Run the app
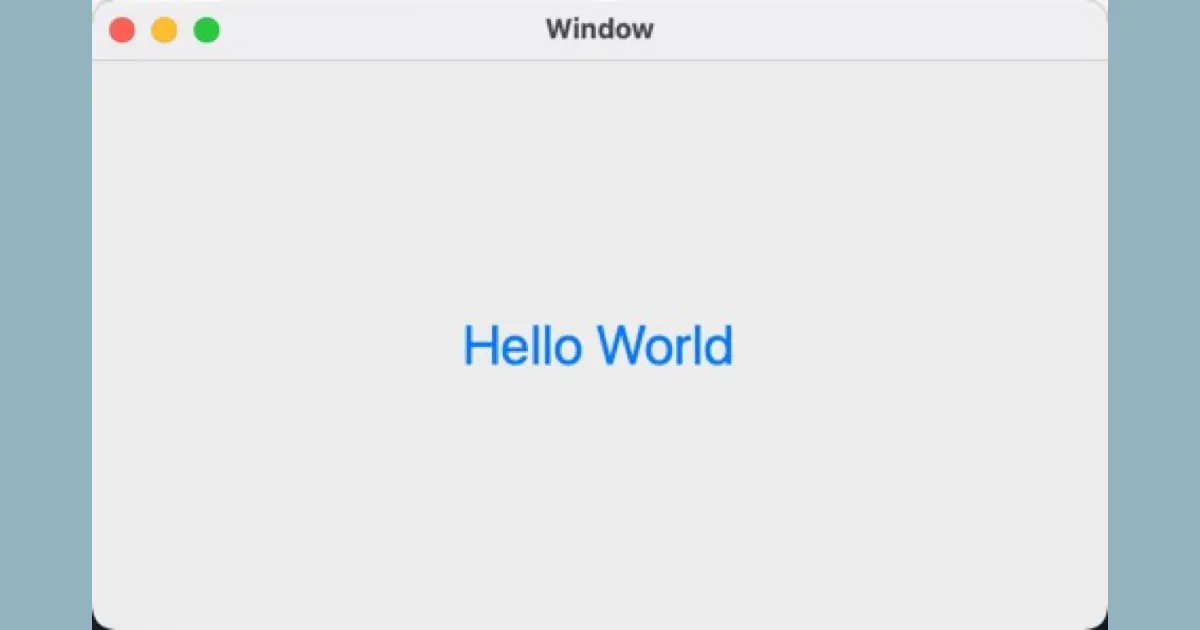
Let’s run the app. Click the “Run” button or press the R key with the Command key. Xcode builds the app and launches it. The app is launched, the window is displayed, and it has a label with “Hello World” text.
Download the sample code
You can download the Cocoa Hello World created in this article from the following link.


